Well, duh. I don't know why I should be so shocked by this, but folks, this is basic. Not only that, but I think that these people's comments reflect badly upon their assumptions about the level of professionalism of artists in general, and me in particular. I am the woman who packed her table saw in a truck and drove it to Mexico, to build her own stretcher bars on the roof, because Mexican carpenters have not yet discovered carbide-tipped saw blades, and kept making passes at me. I MEAN IT. I'M SERIOUS. Stop patronizing me.
Sorry to get testy so early in the day. Here we go.
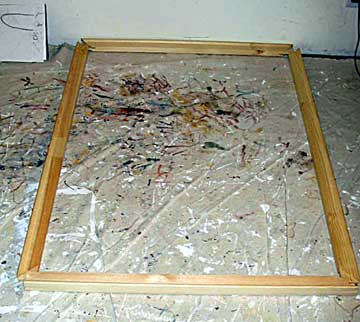
I finally gave up building my own stretcher bars, because apartments in Brooklyn just aren't big enough to hold a table saw, and the weather is too bad to put it on the roof. These are Creative Mark heavy-duty 36" x 48" stretcher bars, ordered from Jerry's. They have bevelled edges and precision-cut corners; you still, however, have to be very careful to put them together at right angles.
 Set them up like this, against a wall.
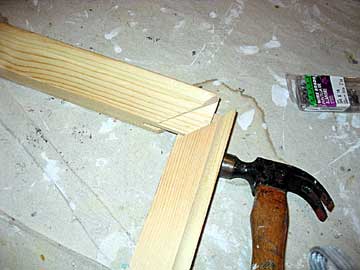
Although the notches for the corners are cut for you, they won't just slide into place. You have to whack them with a hammer.
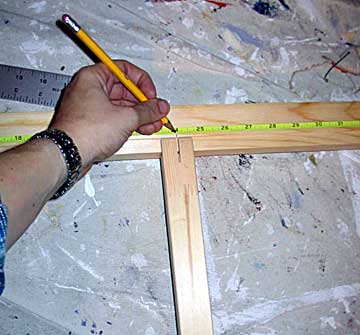
 Make sure each corner is squared with a T-square--do not eyeball it. Gabriel will supervise.
Glue is actually not required for these types of corners, which is useful if you succumb to wishful thinking and discover, later on, that you've gotten the corners crooked.
 Pre-cut and recessed cross-braces are also available through Jerry's. They will notch the center braces for you if you ask nicely, and if they happen to have the right lengths in stock (!@%!^$!#). For this canvas I am only bracing the long side, since for some reason they didn't carry 48" braces.
Measure and make sure that the brace is exactly in the center of both sides. It's no good if you brace it all caty-wompus.
 Glue and nail the brace into place--the nails are only to hold it until the glue dries. Gabriel will supervise the glue cap.
Now we measure and cut the canvas. This is heavy, rough-weave Polish linen; as you can see, I am only using cotton duck canvas for a drop cloth. That is because the linen is a phenomenally beautiful, high-vibration, organic thing, all by itself--you put a stroke of paint on it and it already looks like a Degas. Cotton duck canvas is just blah. Linen is also phenomenally expensive, which is why I didn't start painting on it until I'd been practicing for 17 years. It's also why you have to take out a third mortgage to afford one of my big paintings (sorry, Badger.)
 Oops. High texture is a good thing; holes in the canvas are not.
Avoiding the hole. The extra foot of damaged canvas goes into the bag of interesting things for fooling around with later.

 As far as I know, other artists may skip this step--most wrinkles will be removed in the stretching and gessoing process. However, if the wrinkle does survive the gessoing, it's permanent. I'd rather not take that risk.
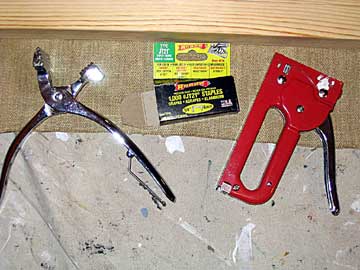 Necessary stretching tools: canvas pliers, staples, staple gun. Always take the old staple box with you to the hardware store when buying new ones, preferably with a few staples still in it to compare. All 1/4", 6mm staples are not created equal, damn and blast. I've already made two trips to Lowe's this week, and now I have to go to Home Depot.
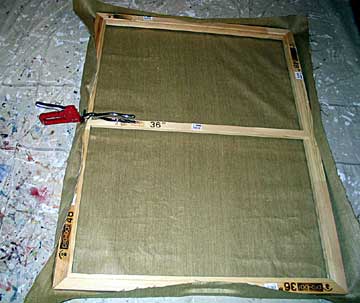 Now we get to the crux of canvas stretching technique. Start from the center. Put two or three staples in the middle of one side, then go to the side directly across from it, pull as hard as you can, and put two or three staples in. Then do the same on the other two sides, so that you have a diamond of tightness in the middle. Keep moving around, working out from the center, pulling with the pliers as you staple.
 To use the pliers, fold the edge you are working on to get a good grip. Use the bump on the top of the pliers against the stretcher for leverage. Pull the pliers over, back and down to get the canvas as tight as possible, then staple it down. Using pliers and a good staple gun will still not protect your hands completely; you know you're doing it right when there is no skin left on your knuckles.
 Work around as evenly as possible until you get to the corners. The corners are the hardest part; keep using the pliers until you can't possibly get a grip on them any more. You don't want a loose pooch at the corner. Before you staple the corner down, fold the canvas so that the double thickness is underneath, and the fold occurs right at the corner, like so:
 Then staple that baby down.
 With any luck, once you get all the staples in, it should look pretty good. It probably won't be perfect, however; with all your best efforts, there will still be a few puckers. Don't panic. Before ripping out the staples and trying again, spray a little water on the puckers and see if they vanish. A coat of gesso will usually tighten away wrinkles, too, but it's best to try the water first.
 Spraying water on the back is also a good way to tighten a canvas that has gotten all loose and shimmery because the weather has changed, as weather tends to do. Remember that wood, fabric, oil and wax are all organic substances; their condition fluctuates with the seasons. You can't be rigid in your expectations of them. Even with your best efforts, a canvas will still sometimes come out with a torque in the bar, so that one corner pops off the wall; this is what frames are for.
You can also use those little wedges of wood that you slide in the notches at the corners to tighten a loose canvas; these are called 'corner keys.' I was using them wrong at first, gluing them in when I built the stretcher, so that when I discovered my corners weren't square, there was nothing that could be done. Let this be a lesson to you.
You say, my God, Serena, you are known for boring and long-winded posts, but this one takes the cake. Why, Serena, why?
Well, this is an illustration of just how much work it takes to create the illusion that no work has been done at all. You only notice the canvas when something has gone wrong; when there is a pucker, a corner popping up, a ragged edge peeping out the back. If I don't get this stuff right, all future labors will be in vain.
And we have not even gotten around to taping and gessoing yet.


20 comments:
If everyone else's blog were half as interesting and informative as yours --I'm forwarding the link to How to Stretch a Canvas to any aspiring painters on my e-mail distribution list-- then the blogsphere --is that a word?-- wouldn't be the enormous cyber wasteland it actually is. To me, anyway.
Really like "Fallen Star", btw.
when i was in art school we were taught all of this, aren't they still? it was so mandatory that using a prestretched canvas for anyhing other than notes was a subversive act--the part about not noticing the canvas unless it was noticeable was The Point back then. and now here you tell me that my subversive acts will go unremarked now? go figure. i had the exact same red staplegun, too.
new here, via badger. i'll look around some, thanks.
We have the same cat! Only mine is named Milton.
Jo's cat is Gabriel without the bones. Milton's a sprawly, astonished rag. I think Gabriel has much more poise and control.
p.s. I am dying for more of the charming, tiny, talkative doodles.
Grazie, all! The drawing drawing will have some interesting competition, now.
Gabriel is, physically speaking, an archetype, but psychologically speaking he is unique. I suspect that he's the reincarnation of some obsessive pervert who had a thing for me in a past life.
Ok, that's it. I'm coming over to help you (get in the way, ask a thousand questions, botch things)make stuff.
I remember something about stretching, or was it gessoing, the canvas on humid, rainy days. Is that better or worse?
Also, is it very bad to build my stretcher with a hand saw and a wooden angle-fix? Because buying those heavy duty beauty or a table saw is a tad expansive for me. Not to mention there's no roof for me and I live in a studio apartment.
Hey, if you can manage with a hand saw, more power to you.
And if you gesso on a rainy day, it will take longer to dry, but I don't think there's anything better or worse about it.
Thanks...I think I understand now why not many people use hand saw.
The best, and definitely the most entertaining, instructive page I have ever read about canvas. Bless you, and all your descendants throught eternity, lady.
Just so you know good content lasts awhile - school taught in photographic arts, now mixing media & researching things like making canvas tight & her you are - thanks!
most thorough online version i've found on how to stretch a canvas. thank you.
Love your style and you were most helpful.........thanks Josephine
From those of us with fuzzy memory who are returning to the world of play and art, thanks!
Great! I've been stretching canvas for years with no problem, but I stretched these latest in the great heat of the moment and now they go amazingly floppy during the night when it's cool, which means I have to leave them in the sun before I paint. I am chewing over whether to re-stretch them when there's a rainstorm. .....or what do you think about if I sprayed water on the back and re-stretched while the canvas is still damp? I've never had such floppy ones and they are maddening really.
Thanks for understanding the How to Stretch I am very much affected and affable with this approach to get teach through how to wooden stretcher bars please write a detailed article on this topic as well
With so many people suffering from back pain nowadays, it’s easy to see why we might be looking for some relief. Desk jobs and poor posture lead to a lot of pain in the back, especially the lower back. But there is a solution for it besides doing yoga and stretches every now and then For more information visit here;https://bodyeveryday.com/best-back-stretcher/
Making Canvas frames, a common mistake people do is when stretching a canvas. a great post to understand it. the other part is the quality supplies. you can check thost here Canvas Frames
Great job! Using a pre-notched stretcher bar, rust-free staples, and a canvas stretching machine are just some of the tools you will need to stretch a canvas. But I wondered how to find a canvas stretching Sydney service that can stretch your artwork properly.
Post a Comment